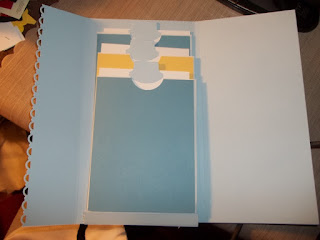
ok, let's get started. You'll need a 8-1/2 x 11" piece of cardstock. Score it at 2", 2-1/4", 6-3/4" and 7". (score with the long piece at the top)
Then fold on your scored lines to make the album base.
Now you need 3 business sized envelopes. It's ok if they're security ones, you wont see it. seal the envelopes shut and then cut one 5-3/4", one 6-3/4" and the last one 7-3/4".
Once you have your 3 envelopes cut, punch a half a circle out of the top with a circle punch (mine is Stampin Up, 1-3/8")
Now we need to make an accorian folded piece for the album to hold our envelopes. Cut a piece of cardstock 2-1/2" by 4-1/4". then score the LONG ways every 1/2" until you have 5 parts.
Now glue one end into your album.
Now your going to start adding the envelopes in. ONLY glue the bottom part of the envelope into the accordian folds. The envelopes should be able to be lifted up from the album.
You'll see above the envelope is only blued at the BOTTOM. Glue in the other 2 envelopes into the folds, and glue the folds together. Play with it first to make sure it "works" before you glue...
They should all be glued in and able to flip forward. Now you need to cut some cardstock to cover your envelopes and make them look pretty! Each piece will be 4" wide, cut 3 pieces (one 5-1/4" long, one 6-1/4" and one 7-1/4" long). Punch a half circle out of the top of each one.
and adhere them to the front of the envelopes.
Now you need some inserts to go into the envelopes! you'll need 3. They'll all be 3-3/4" wide. Make one 5-1/4" long, one 6-1/4" long and one 7-1/4" long. Punch out some tabs wtih a Stampin Up tab punch and adhere to the top of each one.
Then slide into the envelopes.
Now we add the cat to the table since we don't have enough stuff on it. LOL
Isn't he HANDSOME?? I love him.
ok, back to the album. Now your ready to decorate it! Of course you'll want to use Treasure Box Designs patterns for your ablum! I used Birthday Baby and Zoo Babies files.
You'll need a belly band to hold it all together. Cut a strip of cardstock 1-1/2" by 11". Wrap it loosley around the album then glue the ends of the band together. you don't want it too tight.
And here's the finished outside!
Isn't it CUTE? I just love it. I'm going to put this one and a girl version on ebay. So if you don't want to MAKE one, you can buy it in my store. Give me a couple of days to get it listed!
Thanks for stopping by, and don't forget to check out the patterns at Treasure Box Designs!!


3 comments:
Thanks soo much for the tutorial. I am totally going to have to try that one. :)
Great tutorial!!!!!!
Let's do this in class?!!
Post a Comment